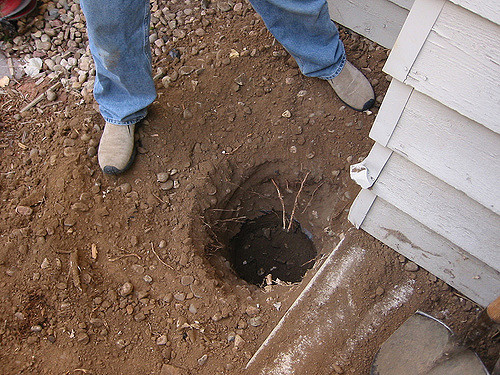
Post hole digging is one of the most important parts of fence installation. With properly dug post holes, your fence will be aligned, stable, and secure. Without them, your fence could easily fail. If you are curious about the post hole digging process or plan to do some DIY post hole digging, check out our step-by-step post hole digging guide. If you aren’t up for all that extra work, contact the fencing experts at Jay Fencing to get the professionals to do it for you!
Ready for your own beautiful backyard fence?
Post Hole Digging: 9 Steps
Not sure how to prepare for your new fence? The first step before installing a fence is to dig your post holes. We’ll provide an in-depth guide for post hole digging below. But first, let’s take a look at some materials you may need:
- A post hole digger (can buy one from many hardware stores or online)
- String or thin rope
- Water (can use a bucket or ideally, a hose)
- Concrete
- Wheelbarrow
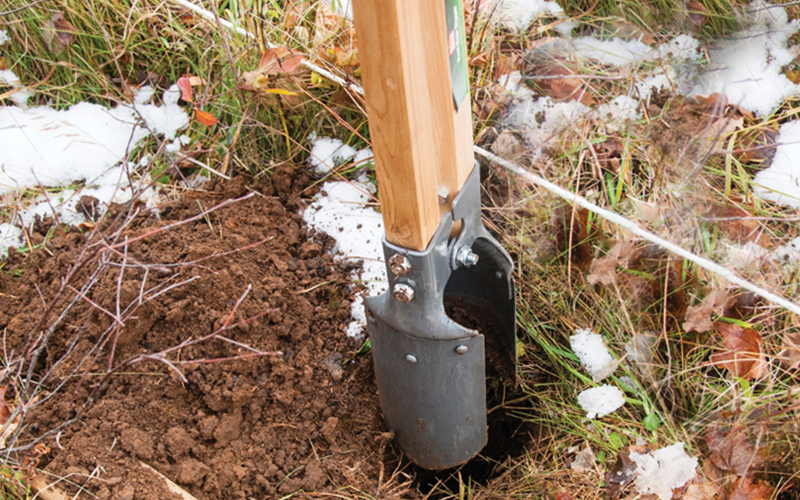
Keep in mind these are just some of the materials you may need. There are many different methods for post hole digging. Some people choose to dig by hand with just the help of shovels. There are also a wide variety of post hole diggers available, all varying in level of experience required to use. In our guide, we will be looking at how to dig post holes using the type of post hole digger seen in image #1 below.
This guide uses information from: WikiHow, Family Handyman, Adelaide Brighton Cement Ltc, and Lowes.
Step 1: Get A Post Hole Digger
Before you can do any work, you’ll need to get your hands on a pair of post hole diggers! You will be faced with a variety of options. Some heavy-duty post hole digging machines are available to rent from hardware stores or fencing companies. However, these can be difficult to use and, if used incorrectly, can result in serious injury. For the inexperienced handyman, it is best to use a pair of handheld diggers, like the one seen in image #1 above. You can buy diggers online from sites such as Amazon, or right at your local hardware store.
Step 2 – Lay Out Your Post Locations
If you want your fence to be aligned properly, you’ll have to do the work ahead of time. Using your string or thin rope as well as stakes, you can lay out the exact location you plan to have your fence and your post holes. You will want to drive your stakes into the ground with a sledgehammer, and then tie from stake to stake. This will reduce the risk of making a mistake. If you dig a hole in the wrong spot, it can completely throw off your entire project! Plus, then you’ll have a hole in the middle of your lawn. To reduce unnecessary work and damage, ensure you take the time to lay out your post locations before you dig.
Step 3 – Check For Utilities
Before you dig, it is very important that you check for any underground utilities before you do ANY digging. Residential properties usually have many underground pipes and wires you may not be aware of at all.
This image from Barrie.ca shows a great example of how many utilities could be buried underground at your home without you even knowing it! When you decide to dig your own post holes, you will have to call your city or town and find out your utilities and locate information.
However, if you work with a professional fencing company, they will do all that work for you. It is also important to know that in some areas, digging without checking for your utilities beforehand could actually be illegal or may break a local bylaw. Don’t take a chance – call your town or city first.
If you aren’t sure how to find locates on your property, you can do a quick google search of your area +” locates”
If you aren’t sure about DIY fencing, contact the professionals at Jay Fencing to learn more about working with the pros!
Step 4 – Begin To Dig Your Post Holes
Now that you have done all that preparation, you can finally begin digging your post holes! As seen in the image above by Twist and Turn Digger, hold your post hole digger with both hands and stand with good posture. The handles should be held close together. You will then have to apply force and push your digger into the ground, where you previously had your lined out stake.
You should do your research ahead of time to determine how deep you must dig for the type of fence you will be installing. However, keep in mind your fence holes will have to be very deep! According to WikiHow, “There is only one hard-and-fast rule when you’re digging a fence posthole: Dig a hole for the post that is half as deep as the fence is high.”
However, some sites suggest digging a hole that is 25% of the post length. It is up to you to determine what you think is best!
Step 5 – Continue The Digging Process
Check out this quick video below to see a regular homeowner and YouTube begin the post hole digging process in her backyard!
Once your post hole digger is in the ground, you will then spread the handles apart. By doing this, soil and other debris will gather in the “jaws” of the post hole digger. Once you have a secure grip on the soil, you can bring the digger out of the hole and release the soil by closing the handles back together. After that, you will have to repeat the process in the same hole. Every time you put your digger into the post hole, you should go further and further into the ground. You may have to rotate your digger if difficult or obstructive items, such as rocks or roots, get in the way.
Step 6 – (Optional) Wet The Soil
Depending on the type of soil in your yard, you may continuously find hard or sandy material within your new hole. This type of material can cause many difficulties while digging, creating even more manual labour for yourself. If you run into this problem, you can use your hose to wet the soil and allow it to soak for a while. By doing this, you will help to break up the materials and help make your job a lot easier!
Step 7 – Position Your Posts
Once you have repeated steps 4-6 for every marked hole in your yard, you can now begin to install your posts. You will want to ensure you position and plumb your posts very carefully before you move forward. Watch the quick video below to see as two homeowners position their posts. You can see how they use support posts in the process, to help ensure their posts stay in place!
After you fill the holes and the concrete hardens, you will not be able to fix mistakes such as a leaning post! You will also want to use a level to ensure the post is not leaning – sometimes it can be difficult to tell by just looking.
Step 8 – Prepare Concrete
Once you are 100% sure that your posts are in the correct position, you can begin pouring concrete into the post holes. You may also want to do some research on different concrete techniques and types before you purchase your concrete. There are different techniques you can use – but some are better and more efficient than others. For example, WikiHow outlines the technique that some contractors or DIY-ers. use. They pour pre-bagged concrete into the hole and simply pour on water and move on. Though this is a quick method, it is definitely not the strongest! If you want your new fence to last, avoid cutting corners to save time.
To create stronger concrete, you will want to use a wheelbarrow and bags of concrete mix. You can also create your own concrete mix using a variety of common materials found at almost every hardware store. This can be a good idea if you are digging many post holes. When adding water to your concrete, don’t add too much! Even though you may be tempted to create a more watery, easy-to-use concrete mix, it’s better to have harder concrete. Watery concrete will not be as strong.
Step 9 – Pour Concrete
Once your concrete is ready, carefully pour it into the post holes. You may need to reposition your posts a bit, as they could move as you are setting in your concrete unless you have an extremely stable hand! Once you are satisfied with your posts positions, ensure you leave any supports keeping the post in place alone for approximately one hour, or longer to be safe. Though the concrete may look dry, it will only be dry on the surface. It’s important not to touch or move your posts for a few days to ensure they set properly.
DIY vs Professional Installation
Considering doing it yourself for post holes and fencing? DIY projects are becoming more and more popular, especially among new homeowners to save money. However, it is a good idea to look at the pros and cons of DIY vs professional installation. With DIY, you have full control over your project – you can finish it as quickly as you like, or choose to take your time. It will also cost you less up front. Some homeowners get great joy out of DIY projects.
However, DIY fence installation can create a lot of problems is one of the most difficult parts of the fence installation process. Post hole digging not only requires precision, but it also requires physical strength. As seen in the guide above, post hole digging with handheld diggers can be a physically strenuous activity. Even if you choose to work with digging machinery, an inexperienced do-it-yourselfer can easily injure themselves while digging or cause serious damage to their property if holes are not dug in the correct place.

The average homeowner also does not have all of the tools and materials required to properly install a fence. Most homeowners do not have the know-how or experience and must rely on books or online guides and videos. Though guides can be helpful, they can only teach you so much. Without a professional, you may find yourself stuck without anyone to help you navigate unforeseen problems.
When you work with fence installers, you can have the peace of mind knowing the entire project, including the tiring post hole digging, will get done – even if you know virtually nothing about fence installation! It also ensures the job is done on time, and that all the proper, high-quality tools and materials will be used in your fencing project. Here are other some reasons why working with an installer is beneficial:
- Helps You Choose The Right Fence – As mentioned above, there are so many options when trying to choose a fence! Fence installers will help you narrow down your choice and provide you with fencing information you may not otherwise have known.
- Knows Weather/Soil Conditions – A professional installer knows when is the best time to dig your post holes. For example, in the snowy and wet winters or soggy spring, digging may be nearly impossible or just not ideal. They will also know about soil conditions and how to act if a problem, such as rocky or sandy soil occurs.
- Knows Local Bylaws – Local fencing bylaws outline the rules and regulations you must follow when installing your fence. If you do not follow these bylaws, you may have to tear your fence down and start all over again! In a worst-case scenario, you may find yourself dealing with legal troubles.
- Saves You Time And Money – Installing a fence yourself can take a significant amount of time, especially if you are not an experienced handyman. Working with fence installers not only saves you time, but it can also save you money in the long-term! Though it will cost more upfront, when you work with professional installers, you won’t have to worry about costly repair fees or extra maintenance due to poor installation.
Expertly Install Your New Fence With Jay Fencing!

Call on Jay Fencing to install your new fence now! When you work with a professional fencing company, they can help you decide on the right fence style for you and all of your unique preferences and needs.
Jay Fencing has over 30 years of experience and has completed over 100,000 projects!
They will also know and understand fair pricing, and will only do the highest quality work. Avoid confusion and skip right to the beautifully installed fence of your dreams with Jay Fencing!
At Jay Fencing Ltd, you can feel confident that we will only recommend products or services that are best for you and your needs. This means you won’t be buying any unnecessary products or services that will increase the price.
We offer free onsite consultations for all the jobs we quote on!
“Jay Fencing did a fantastic job on our new fence, it was built with quality products, completed on time
and on budget. They are extremely professional and courteous while on site
and this was our third project with them. Thank you again!
– A Jay Fencing Customer, Read more testimonials here!
WikiHow / Family Handyman / Adelaide Brighton Cement Ltc / Lowes

